Tutorial: Generate Association Analysis Only
This example will show you how to generate the association analysis step only. It will guide you through how to properly set the logic, remind you to set the environment, list all the additional files you need, and finally which user parameters need to be set.
Section: Logic and Overview
Association Analysis only means you only want to run the association anlysis. It makes an assumption that you already have the null model file (.rda) pre-calculated and have a pre-calculate variance ratio file (.varianceRatio.txt) and want to re-use/use it in this step by setting the keywords NullModelFile and VarianceRatioFile located in the config file. These two files are the result of running GenerateNull:true.
Choosing to run just the association analysis step is analagous to setting the pipeline logic kewords to the following:
GenerateGRM:false
GenerateNull:false
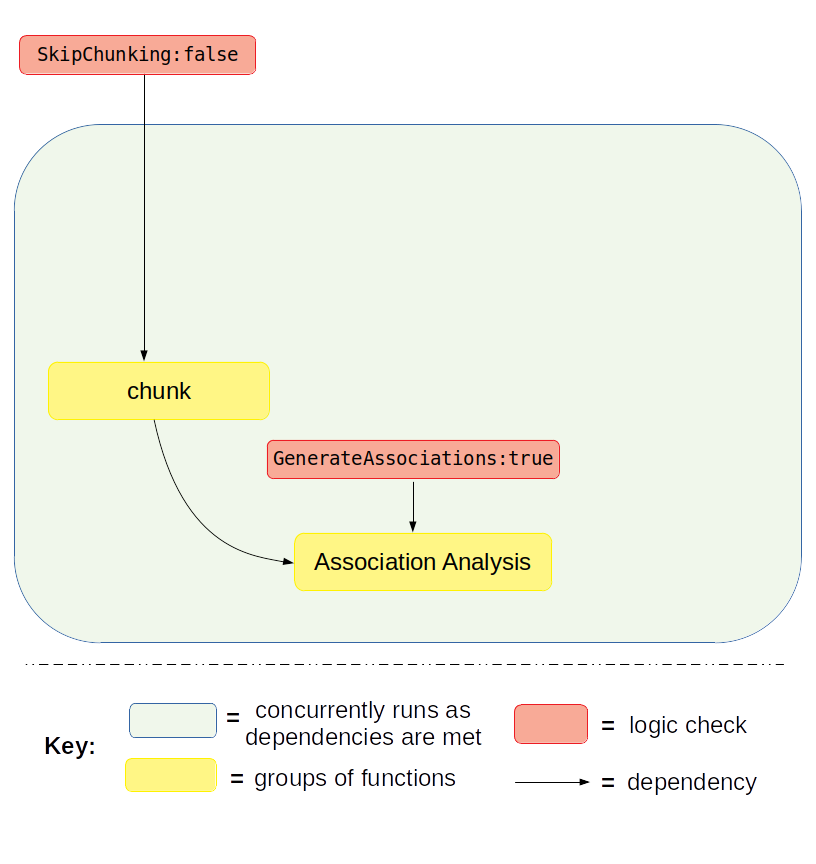
GenerateAssociations:true
GenerateResults:false
- When
GenerateAssociations:true, theSkipChunkinglogic comes into play. This logic parameter depends upon whether you have already chunked the genotype and/or imputation files into windows and saved those from a previous run. If you have not chunked or didn’t save them you will set
SkipChunking:false. You will be following all the OPTION A: Imputation files need window chunking steps.If you have saved chunks, then you can reuse those chunked files and set
SkipChunking:true. You will be following all the OPTION B: Imputation files do not need window chunking and will be reused steps.
Warning
This step produces the raw associaions results concatenated into a file. It does not clean up the data, perform the proper flips, or generate graphs/figures. If you want the raw data in addition to the previously mentioned actions, be sure to also set GenerateResults:true.
Section: Step-by-Step Tutorial
OPTION A: Imputation files need window chunking
If the pipeline is set to the above logic with SkipChunking:false, the following workflow will be executed:
(A) STEP 1: Set the logic – if window chunking is needed
As stated about above, open your config file (.txt) and make sure the logic is set to the following:
GenerateGRM:false
GenerateNull:false
GenerateAssociations:true
GenerateResults:false
SkipChunking:false
(A) STEP 2: Set the environment
Open your config file (.txt) and make sure you set the path to where the bind point, temp bind point, and container image are located. I suggest you set the BindPoint keyword to the same path as where the container is located to avoid any confusion. If you have a tmp directory you want to use as scratch space, set that path as well. If this doesn’t exist or you choose not to use it, set the keyword BindPointTemp to be the same as the path listed in the keyword BindPoint.
BindPoint:/path/to/bind/container
BindPointTemp:/path/to/tmp/
Container:/path/to/saige-brush-v039.sif
(A) STEP 3: Ensure you have all the files required
For running the null model only, you will need access to the following files:
- LD-pruned plink file
used for when logic parameters
GenerateGRMis set to true and/orGenerateNullis set to true and/orGenerateAssociationis set to true.fulfills parameter
Plinksee Parameter: Plink for formatting
- phenotype and covariates file
used for when logic parameter
GenerateNullis set to true and/orGenerateAssociationsis set to true.fulfills parameter
PhenoFilesee Parameter: PhenoFile for formatting
- chromosome lengths file
used for when logic parameter
SkipChunkingis set to falsefulfills parameter
ChromosomeLengthFilesee Parameter: ChromosomeLengthFile for file formatting
- imputation files or genotype files in vcf.gz format with .tbi index
used for when logic parameter
GenerateAssociationsis set to truefulfills parameters
ImputeDirandImputeSuffixsee Parameter: ImputeSuffix for file input and naming expectations
- pre-calculated GRM with corresponding sample order file
used for when logic parameter
GenerateNullis set to true and/orGenerateAssociationsis set to true.fulfills parameters
SparseGRMandSampleIDFilesee Parameter: SparseGRM and Parameter: SampleIDFile for formatting
- pre-calculated Null model with corresponding variance ratio file
used for when logic parameter
GenerateAssociationsis set to truefulfills parameters
NullModelFileandVarianceRatioFilesee Parameter: NullModelFile and Parameter: VarianceRatioFile for formatting
Note
Missing the pre-calculated GRM files? No problem. If you set the logic to
GenerateGRM:true, one will be calculated for you! Just make sure you also set the GRM parameters you want and set the appropriate paths to the required input files you want. For more information on what parameters you need to fill out, see Minimum requirements for Generating a GRM or look at the GRM only tutorial.Note
Missing the pre-calculation null model files? No problem. If you set the logic to
GenerateNull:true, one will be calculated for you! Just make sure you also set the Null parameters you want and set the appropriate paths to the required input files. For more information on what parameters you need to fill out, see Minimum requirements for Generating a Null Model or look at the Null model only tutorial.See also
For a complete list of files and name formatting of keyword values listed in the config file see Formatting the Required Files.
(A) STEP 4: Set the path and values to all the required input parameters
Now that you have all the required files, it is time to set the values and locations within your config file using the keywords expected. Here are the required keywords and how to specify them:
This
RUNTYPEparameter need to just be here for placeholder purposes, however it is required. It has no impact on the pipeline, except as a header to check that it exists.RUNTYPE:FULL
OPTION B: Imputation files do not need window chunking and will be reused
If the pipeline is set to the above logic with SkipChunking:true, the following workflow will be executed:

(B) STEP 1: Set the logic – if reusing pre-chunked imputation files
As stated about above, open your config file (.txt) and make sure the logic is set to the following:
GenerateGRM:false
GenerateNull:false
GenerateAssociations:true
GenerateResults:false
SkipChunking:true
(B) STEP 2: Set the environment
Open your config file (.txt) and make sure you set the path to where the bind point, temp bind point, and container image are located. I suggest you set the BindPoint keyword to the same path as where the container is located to avoid any confusion. If you have a tmp directory you want to use as scratch space, set that path as well. If this doesn’t exist or you choose not to use it, set the keyword BindPointTemp to be the same as the path listed in the keyword BindPoint.
BindPoint:/path/to/bind/container
BindPointTemp:/path/to/tmp/
Container:/path/to/saige-brush-v039.sif
(B) STEP 3: Ensure you have all the files required
For running the null model only, you will need access to the following files:
- LD-pruned plink file
used for when logic parameters
GenerateGRMis set to true and/orGenerateNullis set to true and/orGenerateAssociationis set to true.fulfills parameter
Plinksee Parameter: Plink for formatting
- phenotype and covariates file
used for when logic parameter
GenerateNullis set to true and/orGenerateAssociationsis set to true.fulfills parameter
PhenoFilesee Parameter: PhenoFile for formatting
- imputation files or genotype files in vcf.gz format with .tbi index pre-chunked
used for when logic parameter
GenerateAssociationsis set to true andSkipChunkingis set to true.fulfills parameters
ImputeDir,ImputeSuffix, andImputationFileList:when
SkipChunking:true, theImputeDirparameter in the config file should be the directory where all your chunked imputation files are located. The suffix remains the same as the original imputation suffix prior to chunking.see Parameter: ImputeSuffix and Parameter: ImputationFileList for file input and naming expectations
- pre-calculated GRM with corresponding sample order file
used for when logic parameter
GenerateNullis set to true and/orGenerateAssociationsis set to true.fulfills parameters
SparseGRMandSampleIDFilesee Parameter: SparseGRM and Parameter: SampleIDFile for formatting
- pre-calculated Null model with corresponding variance ratio file
used for when logic parameter
GenerateAssociationsis set to truefulfills parameters
NullModelFileandVarianceRatioFilesee Parameter: NullModelFile and Parameter: VarianceRatioFile for formatting
Note
Missing the pre-calculated GRM files? No problem. If you set the logic to
GenerateGRM:true, one will be calculated for you! Just make sure you also set the GRM parameters you want and set the appropriate paths to the required input files you want. For more information on what parameters you need to fill out, see Minimum requirements for Generating a GRM or look at the GRM only tutorial.Note
Missing the pre-calculation null model files? No problem. If you set the logic to
GenerateNull:true, one will be calculated for you! Just make sure you also set the Null parameters you want and set the appropriate paths to the required input files. For more information on what parameters you need to fill out, see Minimum requirements for Generating a Null Model or look at the Null model only tutorial.See also
For a complete list of files and name formatting of keyword values listed in the config file see Formatting the Required Files.
(B) STEP 4: Set the path and values to all the required input parameters
Now that you have all the required files, it is time to set the values and locations within your config file using the keywords expected. Here are the required keywords and how to specify them:
This
RUNTYPEparameter need to just be here for placeholder purposes, however it is required. It has no impact on the pipeline, except as a header to check that it exists.RUNTYPE:FULL
Section: Generated Output
See also
For a interpreting and searching the log files for potential pipeline errors, see Parsing Through StdErr and StdOut.