Tutorial: Full Pipeline with Binary Trait
This example will walk you through how to run the full pipeline when the phenotype for association analysis if for a binary trait. It will guide you through how to properly set the logic, remind you to set the environment, list all the additional files you need, and finally which user parameters need to be set.
Section: Logic and Overview
Full pipline means you want to run every component of the pipeline from beginning to end in one go, without re-using any previously calculated data from the pipeline. This is analagous to setting the pipeline logic kewords to the following:
GenerateGRM:true
GenerateNull:true
GenerateAssociations:true
GenerateResults:true
SkipChunking:false
If the pipeline is set to the above logic, the following workflow will be executed:

Section: Step-by-Step Tutorial
STEP 1: Set the logic
As stated about above, open your config file (.txt) and make sure the logic is set to the following:
GenerateGRM:true
GenerateNull:true
GenerateAssociations:true
GenerateResults:true
SkipChunking:false
STEP 2: Set the environment
Open your config file (.txt) and make sure you set the path to where the bind point, temp bind point, and container image are located. I suggest you set the BindPoint keyword to the same path as where the container is located to avoid any confusion. If you have a tmp directory you want to use as scratch space, set that path as well. If this doesn’t exist or you choose not to use it, set the keyword BindPointTemp to be the same as the path listed in the keyword BindPoint.
BindPoint:/path/to/bind/container
BindPointTemp:/path/to/tmp/
Container:/path/to/saige-brush-v039.sif
STEP 3: Ensure you have all the files required
For running the full pipeline, including chunking the imputation files, you will need access to the following files:
- LD-pruned plink file
used for when logic parameters
GenerateGRMis set to true and/orGenerateNullis set to true.fulfills parameter
Plinksee Parameter: Plink for formatting
- phenotype and covariates file
used for when logic parameter
GenerateNullis set to truefulfills parameter
PhenoFilesee Parameter: PhenoFile for formatting
- chromosome lengths file
used for when logic parameter,
SkipChunkingis set to true.fulfills parameter
ChromosomeLengthFilesee Parameter: ChromosomeLengthFile for formatting
- imputation files properly named and formatted or genotype files formatted in same way as imputation files
used for when logic paramters
SkipChunkingis set to true and/orGenerateAssociationsis set to true.fulfills parameter
ImputeSuffixsee Parameter: ImputeSuffix for formatting
- SNP information file
use for when logic parameter
GenerateResultsis set to truefulfills parameter :code: InfoFile
see Parameter: InfoFile for formatting
See also
For a complete list of files and name formatting of keyword values listed in the config file see Formatting the Required Files.
STEP 4: Set the path and values to all the required input parameters
Now that you have all the required files, it is time to set the values and locations within your config file using the keywords expected. Here are the required keywords and how to specify them:
This
RUNTYPEparameter need to just be here for placeholder purposes, however it is required. It has no impact on the pipeline, except as a header to check that it exists.RUNTYPE:FULL
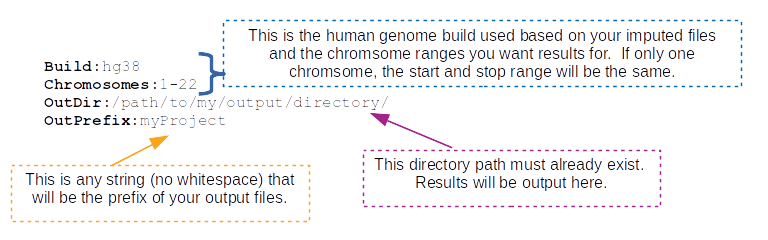
The next set of parameters are the keywords that relate to file inputs:

Here are some required general keyword parameters that need to be set:
The following two sets of keyword parameters affect the GRM step, i.e.
GenerateGRM:true:
The following sets of keyword parameters affect the null model step, i.e.
GenerateNull:true: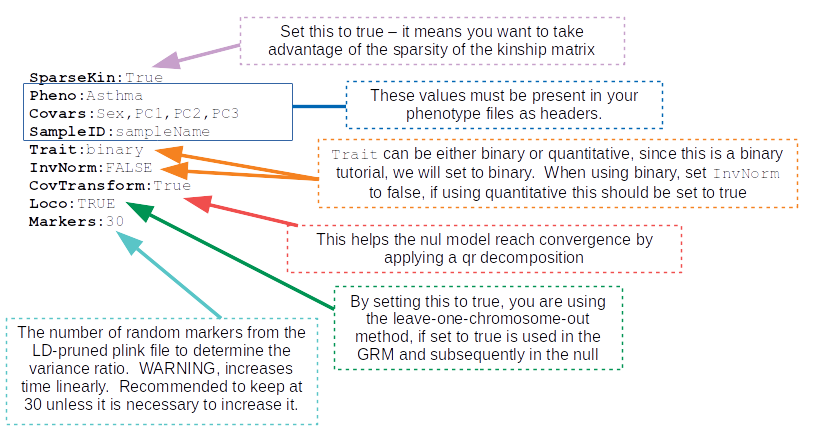
The following sets of keyword parameters affect the association analysis step, i.e.
GenerateAssociations:true:
The following sets of keyword parameters affect the results step, i.e.
GenerateResults:true: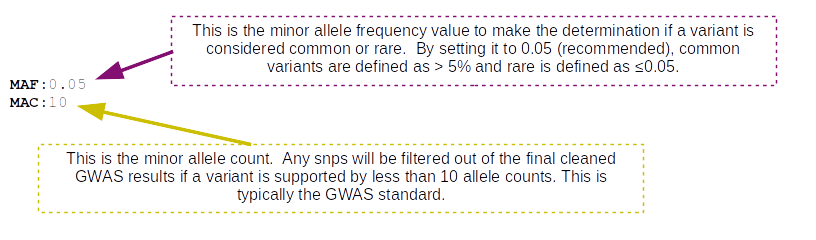
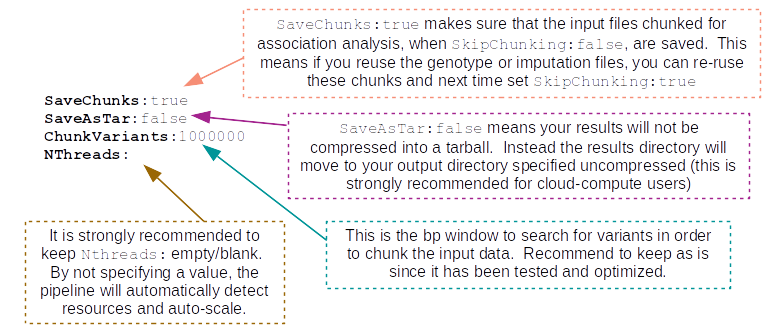
These parameters I recommend to keep as is, unless you are familiar with the pipeline and have a reason to change them:
STEP 5: Running the pipeline
To run the pipeline make sure the files are all accessible to the container relative to the bindpoint.
Once all the files are accessible and the config is ready, the following command will run the pipeline. For those running this through a job-scheduler such as SLURM, LSF, PBS, etc… the log and error files will output to the scheduler keyworkds for log and error so please set those in your job submission. Then you can put the following line in your batch script to run the pipeline:
$ ./saigeBrush myConfigFile.txt
For those running this ** without a job-scheduler** the log and error files will output/print to your screen/standard out. Therefore, please specify log and error files by running the pipeline as follows:
$ ./saigeBrush myConfigFile.txt 1> myLogName.log 2> myLogName.err
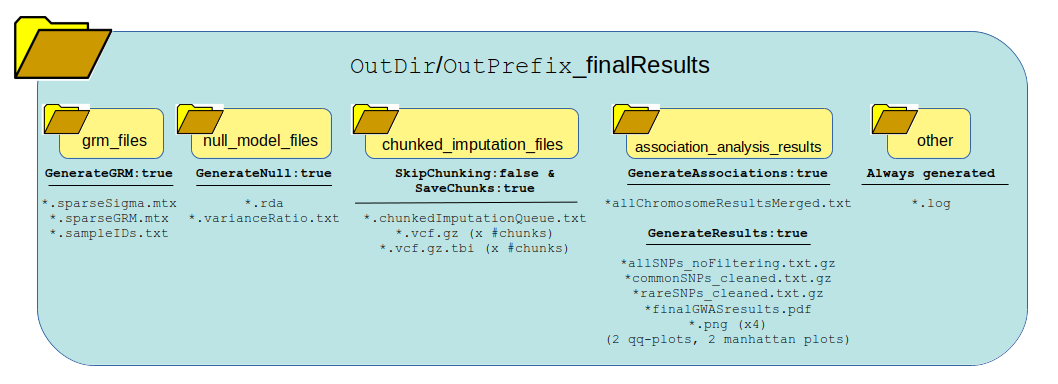
Section: Generated Output
The following graphic shows how all the data generated from running the logic of this pipeline will be organized and which files are present. One thing to notice is the list of files generated in each directory based on whether the pipeline logic is set to true or false. Many of these outputs and be re-used under certain circumstances to save time and bypass running certain steps of the pipeline in the next run.
Warning
IMPORTANT PLEASE READ! Although the pipeline tries its best to not generate output as critical errors occur, this is not always the case. It is particularly important to parse through the standard error output, as well as the log file produced in the other directory of your output directory. The log file can be quite large, therefore, it is recommended to use grep to seach for keywords. I would recommend the following: grep -i "err" other/*.log, grep -i "warn" other/*.log, and grep -i "exit" other/.*log. Also, please see the note below, for additional ways to parse the log file.
See also
For a interpreting and searching the log files for potential pipeline errors, see Parsing Through StdErr and StdOut.
Once it is confirmed that the error and log files ran successfully without major errors, the results and files are ready for viewing. The directory of highest interest will be the association_analysis_results directory.

When GenerateAssociations:true, the pipeline generates raw association analysis data of all SNPs. This set of data does have the allele flips in place, it is uncleaned and unfiltered, unannotated, lacking additional calculations and will not generate any visuals. The file is the *allChromosomeResultsMerged.txt files.
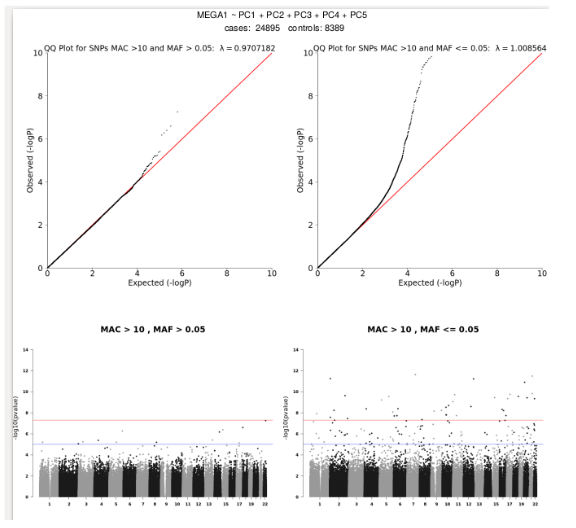
Now, when GenerateResults:true, it takes that file, *allChromosomeResultsMerged.txt and applies allele flips to ensure allele2 is always the minor allele, cleans the data using the MAC filter, annotates the data with ER2, R2, and whether the SNP/Indel is imputed/genotyed/both. This will also split your data in to common vs rare variants as defined by MAF and generate qqplots and Manhattan plots for each. The plots are put in a pdf report, *finalGWASresults.pdf. Each plot is also reported as individual pngs so they can easily be embedded into presentations and documents. Here is an example of one of the pdf reports:
If you open any of the .txt.gz files in located in the association_analysis_results directory produced by GenerateResults:true, the following headers are listed for all the SNPs/indels, in a tab-delimited file:
Header |
Definintion |
|---|---|
CHR |
chromosome name/ID |
POS |
position in chromosome, build is based on input imputation file build |
majorAllele |
major allele based on the allele frequency of your project |
minorAllele |
minor allele based on the allele frequency of your project |
SNPID |
snpID/name |
BETA |
beta value |
SE |
standard error of the beta |
OR |
odds ratio |
LogOR |
log(odds ratio) |
Lower95OR |
the lower 95% confidence interval of the odds ratio |
Upper95OR |
the upper 95% confidence interval of the odds ratio |
MAF |
minor allele frequency |
MAC |
minor allele count |
p.value |
pvalue significance of association (note, for GWAS sig p<5e-08) |
N |
total samples used in this snp analysis |
N.Cases |
total number of case samples |
N.Controls |
total number of control samples |
casesHomMinor |
total number of cases that have homozygous minor alleles |
casesHet |
total number of cases that are heterozygous |
controlHomMinor |
total number of controls that have homozygous minor alleles |
controlHet |
total number of controls that are heterozygous |
negLog10pvalue |
-log10(p.value) |
R2 |
imputation R2 quality |
ER2 |
empirical R2 quality – only for genotyped variants |
GENTOYPE_STATUS |
whether a SNP is genotyped/imputed/both |